折腾了好久,终于能通过arduino把程序烧录至esp8266了,看了好多教程资料,大多不全,模棱两可,不适合初学者。
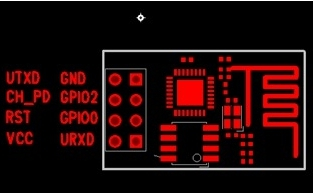
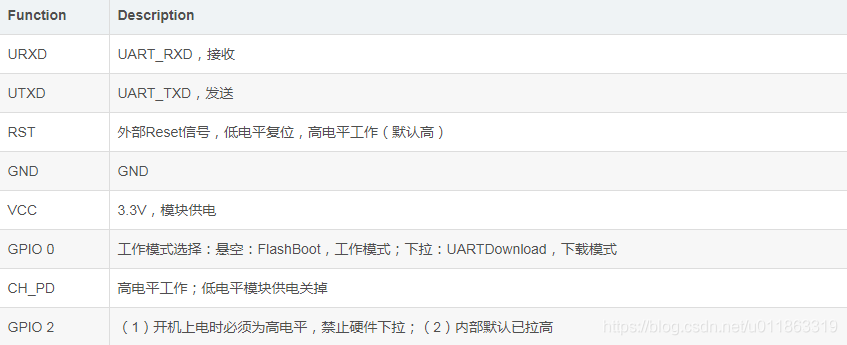
一、引脚定义
参考文献:
ESP8266(一)—引脚定义&接线说明
他的接线部分和我的不同。我的rx-rx,tx-tx,具体有没有接对可以用程序进行测试。
二.接线说明
参考文献:Arduino uno r3 使用 ESP8266 wifi 模块完整流程
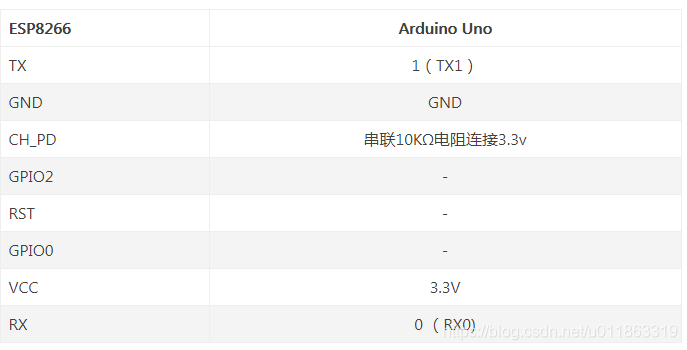
这里我chpd(en)直接接3.3v也没事
把代码上传到arduino,测试接线正确与否。
const int tx = 1;
const int rx = 0;
void setup() {
  //Serial.begin(9600); 注意!!千万别加这行代码
  pinMode(rx,INPUT_PULLUP);
  pinMode(tx,INPUT_PULLUP);

}

void loop() {

}
每个版本的ESP8266波特率不同,一般是115200,你可以多测试几次。

SP8266 的 AT 命令可以在网上查,比如下面的这几个
AT+RST 重启模块
AT+GMR 查看版本信息
AT+CIOBAUD=9600 修改波特率
T+CWMODE? //查询工作模式 1.Station (客户端模式)2.AP (接入点模式)3.Station+AP (两种模式共存)
三.程序烧录至ESP8266
我看网上有的教程说要取掉arduino的啥啥啥芯片,我这个貌似不可拆,还有的是用专门的下载线和烧录软件,这个我也没有。
直到找到了这篇文章
Arduino和ESP8266-模块安装及代码上传
简单介绍,就是:
1.添加开发板管理网站http://arduino.esp8266.com/stable/package_esp8266com_index.json
2.在开发板管理器里安装ESP8266 Community。此步骤可能需要fq,如果没有可以下载离线包,也可以用这个帖子里分享的Arduino IDE安装esp8266 SDK(Windows10),或者自己去github下载
3.选择开发板,可以按照参考文献里的来配置
Arduino和ESP8266-模块安装及代码上传
Arduino烧录ESP8266模块,实现WiFi通信,连接OneNET平台(一)
我是选了Generic ESP8266 Module,其他都是默认没动,这里我最高版本的ARDUINO IDE里编程器下面没有选项,查了很多资料也没有这个问题的解释,所以我换了低一点版本的IDE就有了,我选skII。
4.烧录,在IDE里写好代码后,
将ESP8266设定为FLASH(烧写)模式:当GPIO0(上图紫色线)接地线时,ESP8266是以bootloader模式(编程模式)启动的,这也就是你可以烧写ESP8266(将Arduino上的代码转移到ESP8266上)的时候。在Arduino代码加载完毕时,你将看到Arduino IDE底部提示“上传结束”的信息,然后代码就会开始运行了。
程序上传结束后,将紫色线移除:当你不想将ESP8266一直设定为烧写模式时,将紫色线移除即可,程序将会一直在ESP8266上执行。
来源Arduino结合ESP8266 Serial WIFI模块访问远程服务器
实际操作:
【3】确保如上面连线图所示,A、B两条连线断开,即esp8266的EN、IO0针脚和UNO板子之间是断开的,
【4】点击IDE的 [上传] 按钮,开始通过UNO板子向esp8266烧写程序,
【5】当日志窗口出现 “Connecting…………………_” 字样时,
【6.1】首先,将ESP8266的IO0和UNO板子的GND连接,
【6.2】接着,将ESP8266的EN和UNO的3.3V连接,
程序继续烧写,继而完成。
烧写完成,提示“上传成功”,
【7.1】然后,断开8266的EN、IO0和板子的连接。如果不再需要和Arduino进行串口通信,TX、RX针脚也可以断开。
【7.2】再次将EN和3.3V连接,模块就进入工作模式了。
来源:Arduino和ESP8266-模块安装及代码上传
简单点说就是;在编译快完成时拉低IOO然后,rst低-高-低重启模块进入下载模式。
OK,下面可以写各种程序happy了。
刷at固件,连接和烧写程序一样ESP8266: Reflash Dance!
/*
    This sketch demonstrates how to set up a simple HTTP-like server.
    The server will set a GPIO pin depending on the request
      http://server_ip/gpio/0 will set the GPIO2 low,
      http://server_ip/gpio/1 will set the GPIO2 high
    server_ip is the IP address of the ESP8266 module, will be
    printed to Serial when the module is connected.
*/

#include <ESP8266WiFi.h>

const char* ssid = "401-2G";
const char* password = "415408807";

// Create an instance of the server
// specify the port to listen on as an argument
WiFiServer server(80);

void setup() {
  Serial.begin(9600);
  delay(10);

  // prepare GPIO2
  pinMode(LED_BUILTIN, OUTPUT);//在arduino里默认#define LED_BUILTIN 13,esp8266里默认为GIO2
  digitalWrite(LED_BUILTIN, 0);

  // Connect to WiFi network
  Serial.println();
  Serial.println();
  Serial.print("Connecting to ");
  Serial.println(ssid);

  WiFi.begin(ssid, password);

  while (WiFi.status() != WL_CONNECTED) {
    delay(500);
    Serial.print(".");
  }
  Serial.println("");
  Serial.println("WiFi connected");

  // Start the server
  server.begin();
  Serial.println("Server started");

  // Print the IP address
  Serial.println(WiFi.localIP());
}
void loop() {
  // Check if a client has connected
  WiFiClient client = server.available();
  if (!client) {
    return;
  }

  // Wait until the client sends some data
  Serial.println("new client");
  while (!client.available()) {
    delay(1);
  }

  // Read the first line of the request
  String req = client.readStringUntil('\r');
  Serial.println(req);
  client.flush();

  // Match the request
  int val;
  Serial.printf("%d\n", req.indexOf("/gpio/0")); //查找是否包含/gpio/0,找不到返回-1
  Serial.printf("%d\n", req.indexOf("/gpio/1"));
  if (req.indexOf("/gpio/0") != -1)
    val = 0;
  else if (req.indexOf("/gpio/1") != -1)
    val = 1;
  else {
    Serial.println("invalid request");
    client.stop();
    return;
  }


  // Set GPIO2 according to the request
  digitalWrite(LED_BUILTIN, val);

  client.flush();

  // Prepare the response

  //  String s = "HTTP/1.1 200 OK\r\nContent-Type: text/html\r\n\r\n<!DOCTYPE HTML>\r\n<html>\r\nGPIO is now ";
  //  s += (val) ? "high" : "low";
  //  s += "</html>\n";
  //  // Send the response to the client
  //  client.print(s);
  client.print("<html><body><p>GPIO is now ");
  client.print((val) ? "high" : "low");
  client.println(" </p>");
  client.print("<a href=\"http://");
  client.print(WiFi.localIP());
  client.println("/gpio/1\">开</a>");//当遇到要输出"时,为了避免和print(""),可以写成print("\"")
  client.print("<a href=\"http://");
  client.print(WiFi.localIP());
  client.println("/gpio/0 \">关</a>");
  client.println("</body></html>");

  delay(1);
  Serial.println("Client disonnected");

  // The client will actually be disconnected
  // when the function returns and 'client' object is detroyed
}